Frigate, MQTT using EMQX and notifications using ntfy
Creating a custom stack of Frigate with Google Coral, EMQX for MQTT, ntfy and Caddy on Proxmox to notify detections from my CCTV camera to my mobile devices

Many blog posts on the internet describe installing Frigate through HomeAssistant, in part to allow notifications to be sent to phones. For one reason or another, I've never particularly got on well with HomeAssistant and so decided to create my own stack with Frigate, EMQX and ntfy all orchestrated by Portainer on an LXC container in Proxmox.
Google Coral & Intel QuickSync
What's a Frigate install without a Coral device to do all the image processing grunt work?!
As I'm installing everything on Proxmox, I've first had to install the Google Coral drivers on my Proxmox host. As Proxmox is Debian based, installing the Coral drivers is as simple as following the instructions:

QuickSync can be used in Frigate for decoding ffmpeg and reduce the amount of load on your CPU. Once you've disabled IOMMU and enabled Intel Integrated graphics on your BIOS, you should see the following in /dev/dri if you're running Proxmox 7+
root@pve:~# ls -la /dev/dri
total 0
drwxr-xr-x  3 root root        100 Apr 16 10:32 .
drwxr-xr-x 22 root root       5040 Apr 16 10:48 ..
drwxr-xr-x  2 root root         80 Apr 16 10:32 by-path
crw-rw----  1 root video  226,   0 Apr 16 11:03 card0
crw-rw----  1 root render 226, 128 Apr 16 10:32 renderD128
Once you can find the Coral device using lspci correctly and you've got your Intel integrated graphics set up, you then need to create an LXC container with the following config added to /etc/pve/lxc/100.conf where 100 is the ID of your container:
lxc.cgroup2.devices.allow: c 226:0 rwm
lxc.cgroup2.devices.allow: c 226:128 rwm
lxc.cgroup2.devices.allow: c 29:0 rwm
lxc.cgroup2.devices.allow: c 120:0 rwm
lxc.autodev: 1
lxc.hook.autodev: /var/lib/lxc/100/mount_hook.sh
lxc.cap.drop:
In /var/lib/lxc/100/mount_hook.sh:
mknod -m 666 ${LXC_ROOTFS_MOUNT}/dev/dri/card0 c 226 0
mknod -m 666 ${LXC_ROOTFS_MOUNT}/dev/dri/renderD128 c 226 128
mknod -m 666 ${LXC_ROOTFS_MOUNT}/dev/fb0 c 29 0
mknod -m 666 ${LXC_ROOTFS_MOUNT}/dev/apex_0 c 120 0
Portainer
I like Portainer. Less messing around on the command line - I do enough of that in my day job. Install Docker on a privileged LXC container in Proxmox. Run the following:
root@frigate:~# sudo apt-get update
root@frigate:~# sudo apt-get install \
    ca-certificates \
    curl \
    gnupg

root@frigate:~# sudo install -m 0755 -d /etc/apt/keyrings
root@frigate:~# curl -fsSL https://download.docker.com/linux/ubuntu/gpg | sudo gpg --dearmor -o /etc/apt/keyrings/docker.gpg

root@frigate:~# sudo chmod a+r /etc/apt/keyrings/docker.gpg
root@frigate:~# echo \
  "deb [arch="$(dpkg --print-architecture)" signed-by=/etc/apt/keyrings/docker.gpg] https://download.docker.com/linux/ubuntu \
  "$(. /etc/os-release && echo "$VERSION_CODENAME")" stable" | \
  sudo tee /etc/apt/sources.list.d/docker.list > /dev/null

root@frigate:~# sudo apt-get update
root@frigate:~# sudo apt-get install docker-ce docker-ce-cli containerd.io docker-buildx-plugin docker-compose-plugin
Next, install Portainer:
root@frigate:~# docker volume create portainer_data
root@frigate:~# docker run -d -p 8000:8000 -p 9443:9443 --name portainer --restart=always -v /var/run/docker.sock:/var/run/docker.sock -v portainer_data:/data portainer/portainer-ce:latest
Portainer will run as a Docker container on the Docker daemon - by passing /var/run/docker.sock as a mounted volume, Portainer is able to manage the Docker daemon it's running on.
Installing the Frigate/EMQX/ntfy Stack
The following details configuring Frigate (with an M.2 Google Coral device), EMQX for an MQTT server that is able to parse messages and call webhooks and ntfy - an app that can be configured to push notifications to a mobile device.
Navigate to the Portainer UI, select the environment and click on stacks. Add a stack and add the following Docker compose config in the web editor:
version: "3.9"
services:
  emqx:
    image: emqx:latest
    container_name: emqx
    restart: unless-stopped
    volumes:
      - /var/emqx:/opt/emqx/data
    ports:
      - 1883:1883
      - 8083:8083
      - 8084:8084
      - 8883:8883
      - 18083:18083
  ntfy:
    image: binwiederhier/ntfy
    container_name: ntfy
    command:
      - serve
    environment:
      - TZ=UTC    # optional: set desired timezone
    volumes:
      - /var/ntfy/cache:/var/cache/ntfy
      - /var/ntfy/lib:/var/lib/ntfy
      - /etc/ntfy:/etc/ntfy
    ports:
      - 8181:80
    healthcheck: # optional: remember to adapt the host:port to your environment
        test: ["CMD-SHELL", "wget -q --tries=1 http://localhost:80/v1/health -O - | grep -Eo '\"healthy\"\\s*:\\s*true' || exit 1"]
        interval: 60s
        timeout: 10s
        retries: 3
        start_period: 40s
    restart: unless-stopped
  frigate:
    container_name: frigate
    privileged: true # this may not be necessary for all setups
    restart: unless-stopped
    image: ghcr.io/blakeblackshear/frigate:stable
    shm_size: "150mb" # update for your cameras based on calculation above
    devices:
      - /dev/apex_0:/dev/apex_0
      - /dev/dri/renderD128
    volumes:
      - /etc/localtime:/etc/localtime:ro
      - /mnt/surveillance/frigate/config.yml:/config/config.yml
      - /mnt/surveillance/frigate:/media/frigate
      - /frigate/db:/db

      - type: tmpfs # Optional: 1GB of memory, reduces SSD/SD Card wear
        target: /tmp/cache
        tmpfs:
          size: 1000000000
    ports:
      - "5000:5000"
      - "8554:8554" # RTSP feeds
      - "8555:8555/tcp" # WebRTC over tcp
      - "8555:8555/udp" # WebRTC over udp
    environment:
      FRIGATE_RTSP_PASSWORD: "password123CHANGEME"
Frigate Configuration
Frigate configuration differs on a case-by-case basis depending on your setup. The Frigate documentation is pretty complete and worth following:

But here's an example my config file:
database:
  path: /db/frigate.db

detectors:
  coral1:
    type: edgetpu
    device: pci:0

mqtt:
  enabled: true
  host: IP_ADDRESS_OF_HOST
  port: 1883
  user: frigate
  password: PASSWORD123CHANGEME

birdseye:
  enabled: True
  mode: continuous
  quality: 1

live:
  quality: 1

ffmpeg:
  hwaccel_args: preset-intel-qsv-h264

objects:
  track:
    - person
    - car
    - motorcycle

detect:
  stationary:
    interval: 0
    threshold: 25

snapshots:
  enabled: true
  bounding_box: true
  timestamp: true
  retain:
    default: 10

cameras:
  side_back:
    ffmpeg:
      inputs:
        - path: rtsp://PATH_TO_YOUR_CAMERA
          roles:
            - detect
            - record
    detect:
      enabled: True
      width: 1280
      height: 720
    record:
      enabled: True
      retain:
        days: 7
      events:
        required_zones:
          - "alley_back"
    snapshots:
      required_zones:
        - "alley_back"
    zones:
      alley_back:
        coordinates: 526,720,742,720,359,0,310,0
        objects:
          - "person"
    motion:
      mask: 769,720,1280,720,1280,0,409,0
This sets up the Coral device as a 'detector', enables recording and snapshots on one camera where a zone is configured to detect people inside an unmasked area.
The MQTT configuration is also there to point at the EMQX service defined in your Portainer stack above.
EMQX Configuration
I chose EMQX for two reasons: it can pipeline MQTT messages on to a webhook and it has a real sexy UI.
Log in to the EMQX UI and click Data Integration -> Data Bridge. Create a new data bridge - this will be the webhook defined in ntfy. Use the following to configure your bridge:
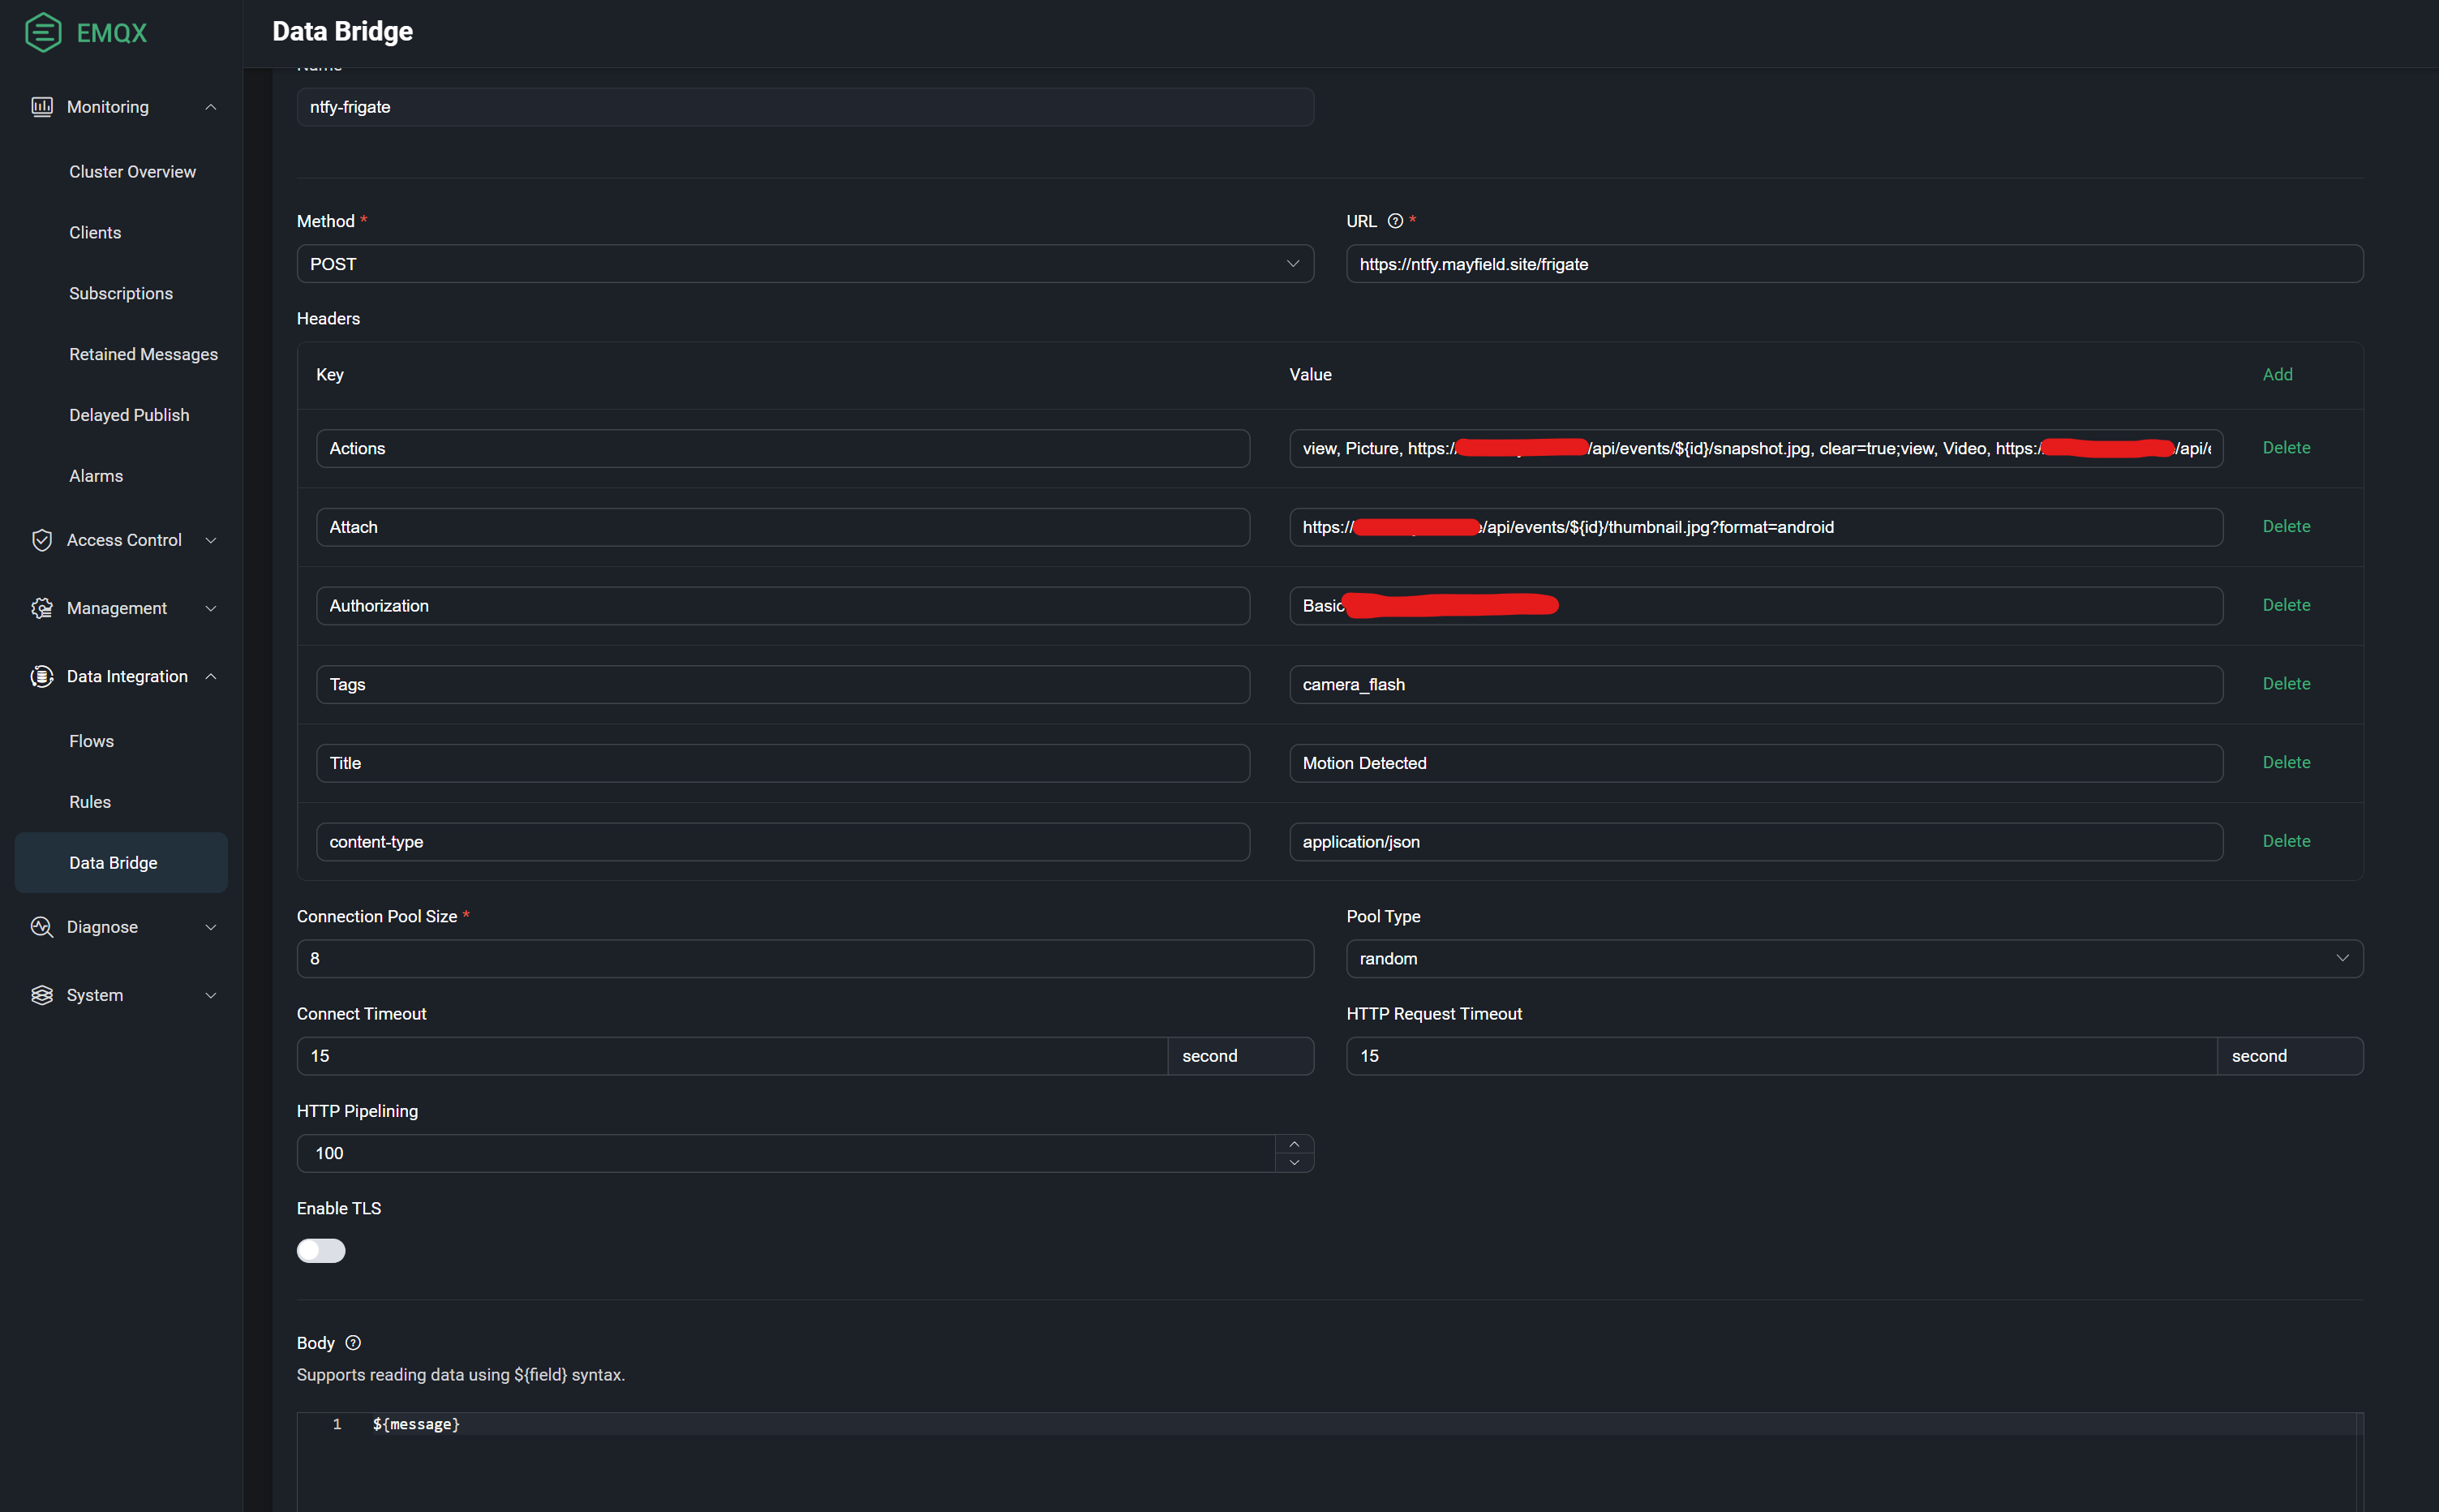
The Actions header is truncated in the screenshot above - the value is:
view, Picture, https://www.yourfrigateinstall.com/api/events/${id}/snapshot.jpg, clear=true;view, Video, https://www.yourfrigateinstall.com/api/events/${id}/clip.mp4, clear=true;
Note the ${message} declaration in the body. You will also need to add a base64 encoded password for ntfy - you can come back to this later after configuring ntfy.
Next add a rule and add this EMQX SQL-like code in the editor:
SELECT
  payload.after.id as id, payload.after.label + ' detected on ' + payload.after.camera as message
FROM
  "frigate/events"
WHERE
  payload.type='new' and payload.after.has_snapshot = true and payload.after.has_clip = true
This will only pass on events from Frigate where a snapshot and clip is present.
ntfy Configuration
There's very little configuration required for ntfy. In the server.yml change the following to these values:
base-url: https://ntfy.yourfrigateinstall.com
auth-default-access: "deny-all"
behind-proxy: true
enable-signup: false
This will enable ntfy to be accessed through a reverse proxy and restricted to users manually set up by the admin.
Caddy Configuration
Caddy is my reverse proxy of choice, for it's ease of configuration and ability to grab TLS certs automagically from LetsEncrypt. Follow my blog post on getting it installed with caddy-security enabled to allow OAuth2 integration:

In the Caddyfile, add the following:
yourfrigateinstall.com {

  @auth {
    not path /api/events/*/snapshot.jpg
    not path /api/events/*/thumbnail.jpg
    not path /api/events/*/clip.mp4
  }

  authorize @auth with mfpolicy
  reverse_proxy YOUR_DOCKER_HOST_IP:5000
}

ntfy.yourfrigateinstall.com {
  reverse_proxy YOUR_DOCKER_HOST_IP:8181

  # Redirect HTTP to HTTPS, but only for GET topic addresses, since we want
  # it to work with curl without the annoying https:// prefix
  @httpget {
      protocol http
      method GET
      path_regexp ^/([-_a-z0-9]{0,64}$|docs/|static/)
  }

  redir @httpget https://{host}{uri}
}
You should now be able to install the ntfy app on your mobile device, connect to your ntfy instance and subscribe to the frigate topic. When Frigate detects something it wants to push an MQTT message about, you should receive an alert!
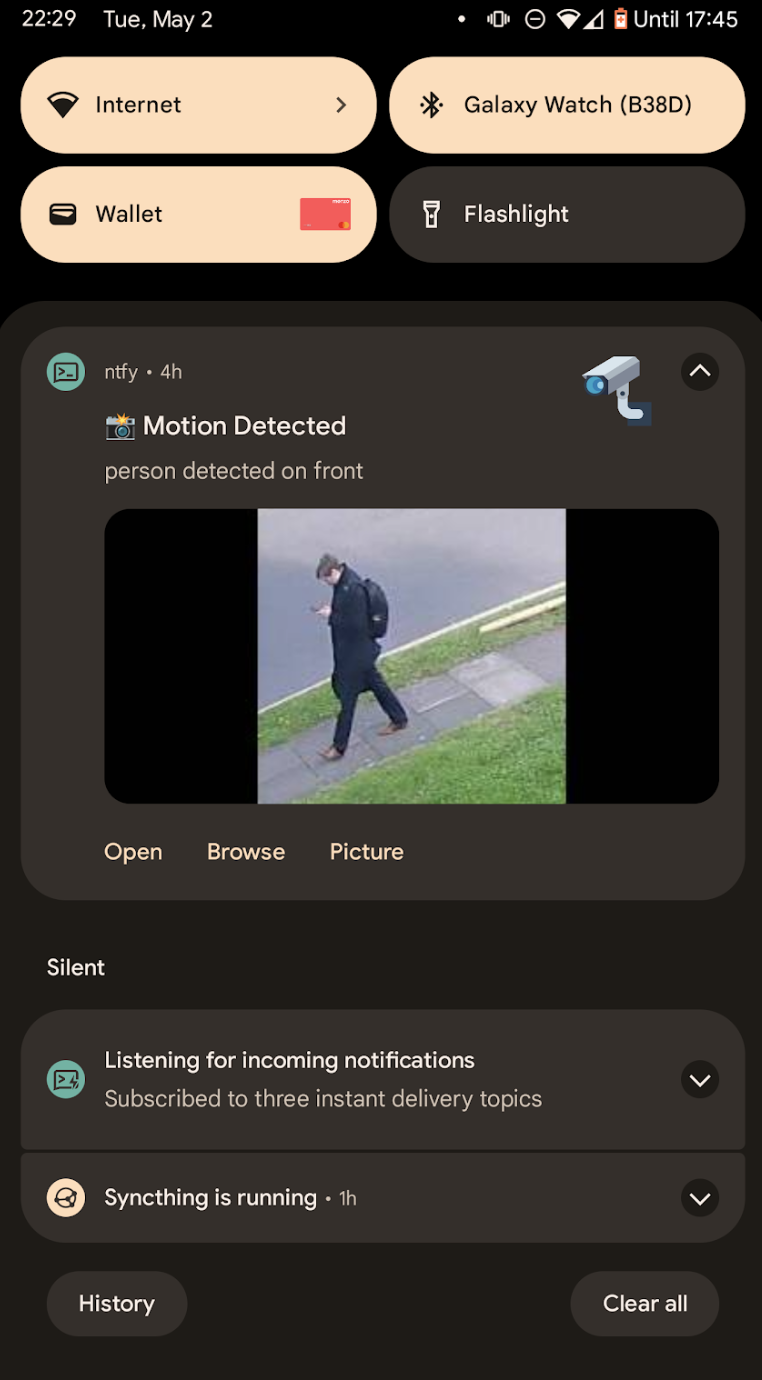
You should then have the ability to view the full snapshot picture or the clip the detection produced.
Comments ()